Difference between revisions of "Tour"
m (Fixing second-person writing) |
|||
| (51 intermediate revisions by 16 users not shown) | |||
| Line 1: | Line 1: | ||
| − | [[File: | + | {{Wrongpage|the feature in New Leaf|the similarly named feature in New Horizons|Mystery Island Tour|the feature similar to the Mystery Island Tours|Boat tour|text=For the website, see [[Island Tour Creator]].}} |
| − | '''Tours''' are | + | [[File:NL Island Tour Orientation.jpg|thumb|Players being oriented about a tour's mechanics]] |
| + | [[File:NL Island Tour Winning.jpg|thumb|Players after winning a tour]] | ||
| + | '''Tours''' are minigames in {{NL}} that are accessible from [[Tortimer Island]]. Hosted by [[Tortimer]], tours can be registered for by speaking to [[Leilani]] in the island's lobby and sitting in one of the chairs in the waiting area. Each tour has an objective that must be completed within a time limit. Completing the objective rewards the player with [[medal]]s, the currency of Tortimer Island that can be used at the Souvenir Shop. Some tours task the player with doing something, such as catching bugs or popping balloons, as many times as possible within the time limit; the more the player does, the more medals they receive. Others have the player complete a task as fast as possible; the more time remaining when the objective is complete, the more medals received. | ||
| − | + | If there are any items in the player's [[pockets]] when going on a tour, they are automatically sold. Any tools or items needed to complete a tour appear in the player's pockets automatically when the tour starts, and additional tools can be rented from [[Lloid]], who appears in the starting area in most tours. On some tours, it is possible to rent a net and fishing rod from Lloid. On tours where the main objective is to catch bugs, fish, or sea creatures, Lloid will only rent out a shovel and axe. On tours where nets and fishing rods are rentable, the player can catch the normal insects and fish they would on the main island during the day, as well as dragonflies and freshwater fish on the tours with a river or pond. The freshwater fish are the same as those caught between 9 a.m. and 4 p.m. in the summer in town. Any items the player picks up or fish and insects caught using Lloid rented tools during a tour can be brought back to Tortimer Island afterward. | |
| + | |||
| + | There are a total of 64 tours, and Leilani gives the player a list of 12 random ones to choose from each day. Additionally, some tours must be unlocked before they can appear on the list. | ||
== List of tours == | == List of tours == | ||
| − | === Balloon Hunt === | + | === Balloon Hunt Tour === |
{{main|Balloon Hunt}} | {{main|Balloon Hunt}} | ||
| − | |||
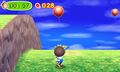
| − | On the | + | At the start of the tour, the [[slingshot]] will automatically be equipped. The goal of the Balloon-Hunt is to shoot down as many balloons floating in the air as possible. On the lower screen of the [[Nintendo 3DS]] will be a wind indicator, which will show the direction the balloons will be flying in, as well as the locations of the balloons. Regular balloons are worth one point, and bunny balloons are worth three points. |
| + | |||
| + | During multiplayer, the balloons on the map are multiplied by the number of players participating in the balloon hunt. Each player will be allocated a color, and can only pop balloons of their respective color. | ||
{{TourTop}} | {{TourTop}} | ||
{{Tour | {{Tour | ||
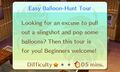
|Name= Easy Balloon Hunt | |Name= Easy Balloon Hunt | ||
| − | |Description= | + | |Description= Looking for an excuse to pull out a slingshot and pop some balloons? Then this tour is for you! Beginners welcome! |
|Difficulty= 1 | |Difficulty= 1 | ||
|Time= 5 | |Time= 5 | ||
| Line 30: | Line 35: | ||
{{Tour | {{Tour | ||
|Name= Official Balloon Hunt | |Name= Official Balloon Hunt | ||
| − | |Description= | + | |Description= Are you getting confident in your abilities with a slingshot and want a harder challenge? Then this is the tour for you! |
|Difficulty= 2 | |Difficulty= 2 | ||
|Time= 5 | |Time= 5 | ||
| Line 45: | Line 50: | ||
{{Tour | {{Tour | ||
|Name= Elite Balloon Hunt | |Name= Elite Balloon Hunt | ||
| − | |Description= | + | |Description= Are you a master of the art of the slingshot? Then sign up for this tour and show you're the best there is! |
|Difficulty= 3 | |Difficulty= 3 | ||
|Time= 5 | |Time= 5 | ||
| Line 57: | Line 62: | ||
|ClearReward= 3 | |ClearReward= 3 | ||
}} | }} | ||
| + | |||
{{TourBottom}} | {{TourBottom}} | ||
| − | + | ||
<gallery> | <gallery> | ||
| + | |||
File:Balloon-Hunt Info.jpg|The info screen on Balloon-Hunt | File:Balloon-Hunt Info.jpg|The info screen on Balloon-Hunt | ||
File:Balloon Hunt Gameplay.jpg|A player playing Balloon-Hunt | File:Balloon Hunt Gameplay.jpg|A player playing Balloon-Hunt | ||
| + | |||
</gallery> | </gallery> | ||
| − | |||
| − | === Bug Catching === | + | === Bug Catching Tour === |
| − | |||
| − | === Fishing === | + | The player is equipped with a [[net]] at the start of this tour. The goal of the Bug Catching Tour is to find as many of the specified insects as possible. Some tours require specific species, or high-selling insects. |
| + | |||
| + | {{TourTop}} | ||
| + | {{Tour | ||
| + | |Name= Easy Bug-catching | ||
| + | |Description= Feel like catching bugs while on a tropical getaway? This tour will let you do just that! Beginners welcome! | ||
| + | Players must catch as many bugs as they can. | ||
| + | |Difficulty= 1 | ||
| + | |Time= 5 | ||
| + | |Gold= Catch 6 or more insects | ||
| + | |Silver= Catch 5 insects | ||
| + | |Bronze= Catch 4 insects | ||
| + | |Clear= Catch 3 insects | ||
| + | |GoldReward= 6 | ||
| + | |SilverReward= 4 | ||
| + | |BronzeReward= 2 | ||
| + | |ClearReward= 1 | ||
| + | }} | ||
| + | <br /> | ||
| + | {{Tour | ||
| + | |Name= Bug Free-for-All | ||
| + | |Description= If bug catching is becoming your favorite activity, then join this intermediate tour and prove your skills! | ||
| + | Players must catch as many bugs as they can. Quantity requirements have increased. | ||
| + | |Difficulty= 2 | ||
| + | |Time= 5 | ||
| + | |Gold= Catch 8 or more insects | ||
| + | |Silver= Catch 7 insects | ||
| + | |Bronze= Catch 5 - 6 insects | ||
| + | |Clear= Catch 4 insects | ||
| + | |GoldReward= 8 | ||
| + | |SilverReward= 5 | ||
| + | |BronzeReward= 3 | ||
| + | |ClearReward= 2 | ||
| + | }} | ||
| + | <br /> | ||
| + | {{Tour | ||
| + | |Name= Fall Bug Tour | ||
| + | |Description= Enjoy bug catching in the fall to ease down the heat of the tropical islands! This tour is for advanced bug catchers! | ||
| + | The player must catch noisy bugs, such as [[cricket]]s, [[bell cricket]]s, and [[grasshopper]]s. | ||
| + | |Difficulty= 2 | ||
| + | |Time= 5 | ||
| + | |Gold= Catch 8 or more insects | ||
| + | |Silver= Catch 7 insects | ||
| + | |Bronze= Catch 6 insects | ||
| + | |Clear= Catch 4 insects | ||
| + | |GoldReward= 8 medals | ||
| + | |SilverReward= 5 medals | ||
| + | |BronzeReward= 3 medals | ||
| + | |ClearReward= 2 medals | ||
| + | }} | ||
| + | <br /> | ||
| + | {{Tour | ||
| + | |Name= Pros-Only Bug Hunt | ||
| + | |Description= Only those with a mastery of bug catching need apply for this, the hardest bug tour available. Can you win? | ||
| + | Players must catch as many bugs as they can. Quantity requirements have increased yet again. | ||
| + | |Difficulty= 3 | ||
| + | |Time= 5 | ||
| + | |Gold= Catch 10 or more insects | ||
| + | |Silver= Catch 8 insects | ||
| + | |Bronze= Catch 7 insects | ||
| + | |Clear= Catch 5 insects | ||
| + | |GoldReward= 12 | ||
| + | |SilverReward= 7 | ||
| + | |BronzeReward= 5 | ||
| + | |ClearReward= 3 | ||
| + | }} | ||
| + | <br /> | ||
| + | {{Tour | ||
| + | |Name= Beetle-Hunting Tour | ||
| + | |Description= Dynastid and stag beetles are popular, and this tour wants to see you snag the most! Beginners welcome! | ||
| + | Players must catch as many beetles as they can. | ||
| + | |Difficulty= 1 | ||
| + | |Time= 5 | ||
| + | |Gold= Catch 6 or more beetles | ||
| + | |Silver= Catch 5 beetles | ||
| + | |Bronze= Catch 4 beetles | ||
| + | |Clear= Catch 3 beetles | ||
| + | |GoldReward= 6 | ||
| + | |SilverReward= 4 | ||
| + | |BronzeReward= 2 | ||
| + | |ClearReward= 1 | ||
| + | }} | ||
| + | <br /> | ||
| + | {{Tour | ||
| + | |Name= Cicada-Catching Tour | ||
| + | |Description= Can't get enough of the cicada's call? Then this is the bug-hunting tour that you'll enjoy most of all! | ||
| + | Players must catch as many cicadas as they can. | ||
| + | |Difficulty= 2 | ||
| + | |Time= 5 | ||
| + | |Gold= Catch 8 or more cicadas | ||
| + | |Silver= Catch ? cicadas | ||
| + | |Bronze= Catch 4 cicadas | ||
| + | |Clear= Catch 2 cicadas | ||
| + | |GoldReward= 8 | ||
| + | |SilverReward= 5 | ||
| + | |BronzeReward= 3 | ||
| + | |ClearReward= 2 | ||
| + | }} | ||
| + | <br /> | ||
| + | {{Tour | ||
| + | |Name= Butterfly-Discovery Tour | ||
| + | |Description= Feel like catching butterflies on a tropical island? Then this is the tour for you! Beginners welcome! | ||
| + | Players must catch as many butterflies as they can. | ||
| + | |Difficulty= 1 | ||
| + | |Time= 5 | ||
| + | |Gold= Catch 6 or more butterflies | ||
| + | |Silver= Catch 5 butterflies | ||
| + | |Bronze= Catch 4 butterflies | ||
| + | |Clear= Catch 3 butterflies | ||
| + | |GoldReward= 6 | ||
| + | |SilverReward= 4 | ||
| + | |BronzeReward= 2 | ||
| + | |ClearReward= 1 | ||
| + | }} | ||
| + | <br /> | ||
| + | {{Tour | ||
| + | |Name= Dragonfly-Discovery Tour | ||
| + | |Description= Feel like catching dragonflies on a tropical island? Then this is the tour for you! Beginners welcome! | ||
| + | Players must catch as many dragonflies as they can. | ||
| + | |Difficulty= 1 | ||
| + | |Time= 5 | ||
| + | |Gold= Catch 6 or more dragonflies | ||
| + | |Silver= Catch 5 dragonflies | ||
| + | |Bronze= Catch 4 dragonflies | ||
| + | |Clear= Catch 3 dragonflies | ||
| + | |GoldReward= 6 | ||
| + | |SilverReward= 4 | ||
| + | |BronzeReward= 2 | ||
| + | |ClearReward= 1 | ||
| + | }} | ||
| + | <br /> | ||
| + | {{Tour | ||
| + | |Name= Giant-Dragonfly Tour | ||
| + | |Description= Wanna try catching gigantic dragonflies in a lush, tropical forest? Then sign up right away and get hunting! | ||
| + | There are an abundance of [[Petaltail dragonfly|petaltail dragonflies]] and their faster cousins, [[Banded dragonfly|banded dragonflies]] for the player to catch. | ||
| + | |Difficulty= 3 | ||
| + | |Time= 7 | ||
| + | |Gold= Catch 10 or more dragonflies | ||
| + | |Silver= Catch 8 dragonflies | ||
| + | |Bronze= Catch 7 dragonflies | ||
| + | |Clear= Catch 5 dragonflies | ||
| + | |GoldReward= 20 | ||
| + | |SilverReward= 14 | ||
| + | |BronzeReward= 10 | ||
| + | |ClearReward= 5 | ||
| + | }} | ||
| + | <br /> | ||
| + | {{Tour | ||
| + | |Name= Market-Price-Bug Tour | ||
| + | |Description= Want to see the Bell value of the bugs you catch as your score goes up? Then this is the tour for you! | ||
| + | Players must catch bugs to meet the bell goal. | ||
| + | |Difficulty= 2 | ||
| + | |Time= 5 | ||
| + | |Gold= Catch bugs worth a total of 20,000 bells or more | ||
| + | |Silver= Catch bugs worth a total of 16,000 bells | ||
| + | |Bronze= Catch bugs worth a total of 13,000 bells | ||
| + | |Clear= Catch bugs worth a total of 10,000 bells | ||
| + | |GoldReward= 8 | ||
| + | |SilverReward= 5 | ||
| + | |BronzeReward= 3 | ||
| + | |ClearReward= 2 | ||
| + | }} | ||
| + | <br /> | ||
| + | {{Tour | ||
| + | |Name= Elite Market-Price-Bug Hunt | ||
| + | |Description= Watch the Bell values rise in this advanced bug-catching tour. Only those with a full mastery of bugs need apply! | ||
| + | Players must catch bugs to meet the bell goal. Requirements are doubled compared to the standard Market-Price-Bug Tour. | ||
| + | |Difficulty= 3 | ||
| + | |Time= 5 | ||
| + | |Gold= Catch bugs worth a total of 40,000 bells or more | ||
| + | |Silver= Catch bugs worth a total of 32,000 bells | ||
| + | |Bronze= Catch bugs worth a total of 26,000 bells | ||
| + | |Clear= Catch bugs worth a total of 20,000 bells | ||
| + | |GoldReward= 12 | ||
| + | |SilverReward= 7 | ||
| + | |BronzeReward= 5 | ||
| + | |ClearReward= 3 | ||
| + | }} | ||
| + | <br /> | ||
| + | {{Tour | ||
| + | |Name= Bug Hide-and-Seek Tour | ||
| + | |Description= Ready for a tough challenge to find mysterious bugs on a tropical island? Then sign up for this advanced bug tour! | ||
| + | Equipped with a net and shovel, the player must catch enough hidden bugs ([[centipede]]s, [[walking stick]]s, [[pill bug]]s, etc.). | ||
| + | |Difficulty= 3 | ||
| + | |Time= 7 | ||
| + | |Gold= Catch 10 or more insects | ||
| + | |Silver= Catch 8 insects | ||
| + | |Bronze= Catch 7 insects | ||
| + | |Clear= Catch 5 insects | ||
| + | |GoldReward= 15 | ||
| + | |SilverReward= 12 | ||
| + | |BronzeReward= 7 | ||
| + | |ClearReward= 4 | ||
| + | }} | ||
| + | <br /> | ||
| + | {{Tour | ||
| + | |Name= Evening Firefly Tour | ||
| + | |Description= Are fireflies your thing? Are your bug-catching skills at an all-time high? Then sign up for this tour right away! | ||
| + | Players must catch as many [[Firefly|fireflies]] as they can. The tour is in nighttime so the fireflies can appear. | ||
| + | |Difficulty= 3 | ||
| + | |Time= 5 | ||
| + | |Gold= Catch 10 or more fireflies | ||
| + | |Silver= Catch 8 or more fireflies | ||
| + | |Bronze= Catch 7 or more fireflies | ||
| + | |Clear= Catch 5 or more fireflies | ||
| + | |GoldReward= 12 | ||
| + | |SilverReward= 7 | ||
| + | |BronzeReward= 5 | ||
| + | |ClearReward= 3 | ||
| + | }} | ||
| + | <br /> | ||
| + | {{Tour | ||
| + | |Name= Hop-To-It Bug Hunt | ||
| + | |Description= Locusts are plentiful, but you only have a very limited amount of time before it's game over. Can you win? | ||
| + | Only locusts add to the score. | ||
| + | |Difficulty= 2 | ||
| + | |Time= 5 | ||
| + | |Gold= Catch 8 or more locusts | ||
| + | |Silver= Catch 7 locusts | ||
| + | |Bronze= Catch 6 locusts | ||
| + | |Clear= Catch 4 locusts | ||
| + | |GoldReward= 8 | ||
| + | |SilverReward= 5 | ||
| + | |BronzeReward= 3 | ||
| + | |ClearReward= 2 | ||
| + | }} | ||
| + | {{TourBottom}} | ||
| + | |||
| + | === Diving Tour === | ||
| + | The player must catch [[Sea creature]]s found at the bottom of the sea by diving to catch them. The island that this takes place on will have water on all four sides, so there is plenty of sea to swim around in. | ||
| + | {{TourTop}} | ||
| + | {{Tour | ||
| + | |Name= Amateurs' Free-Diving Tour | ||
| + | |Description= A tour for beginners just learning the fine art of free diving. It's a great chance to practice the basics! | ||
| + | Players must dive for as many deep-sea creatures as they can. | ||
| + | |Difficulty= 1 | ||
| + | |Time= 5 | ||
| + | |Gold= Catch 6 or more sea creatures | ||
| + | |Silver= Catch 5 sea creatures | ||
| + | |Bronze= Catch 4 sea creatures | ||
| + | |Clear= Catch 3 sea creatures | ||
| + | |GoldReward= 6 | ||
| + | |SilverReward= 4 | ||
| + | |BronzeReward= 2 | ||
| + | |ClearReward= 1 | ||
| + | }} | ||
| + | <br /> | ||
| + | {{Tour | ||
| + | |Name= Shellfish Free-for-All Tour | ||
| + | |Description= Ready to hunt exclusively for [[shellfish]] on this beginners' free-diving tour? Then sign up and get diving right away! | ||
| + | Catch the various shellfish as they spawn along the coastline | ||
| + | |Difficulty= 1 | ||
| + | |Time= 5 | ||
| + | |Gold= Catch 6 or more shellfish | ||
| + | |Silver= Catch 5 shellfish | ||
| + | |Bronze= Catch 4 shellfish | ||
| + | |Clear= Catch 3 shellfish | ||
| + | |GoldReward= 6 | ||
| + | |SilverReward= 4 | ||
| + | |BronzeReward= 2 | ||
| + | |ClearReward= 1 | ||
| + | }} | ||
| + | <br /> | ||
| + | {{Tour | ||
| + | |Name= Seafood Free-Diving Tour | ||
| + | |Description= Do you have a good grasp of the free-diving basics? Then sign up for this tour, and hop into the battle for gold! | ||
| + | |Difficulty= 2 | ||
| + | |Time= 5 | ||
| + | |Gold= Catch 8 or more sea creatures | ||
| + | |Silver= Catch 7 sea creatures | ||
| + | |Bronze= Catch 6 sea creatures | ||
| + | |Clear= Catch 4 sea creatures | ||
| + | |GoldReward= 8 | ||
| + | |SilverReward= 5 | ||
| + | |BronzeReward= 3 | ||
| + | |ClearReward= 2 | ||
| + | }} | ||
| + | <br /> | ||
| + | {{Tour | ||
| + | |Name= High-End Seafood Tour | ||
| + | |Description= Like free diving as well as cooking? Then sign up for this tour to collect fancy ingredients from the sea! | ||
| + | The player must dive for gourmet ingredients, such as [[spiny lobster]], [[abalone]], [[sea urchin]], and [[horsehair crab]]. | ||
| + | |Difficulty= 2 | ||
| + | |Time= 5 | ||
| + | |Gold= Catch 8 or more gourmet ingredients | ||
| + | |Silver= Catch 7 gourmet ingredients | ||
| + | |Bronze= Catch 6 gourmet ingredients | ||
| + | |Clear= Catch 4 gourmet ingredients | ||
| + | |GoldReward= 8 | ||
| + | |SilverReward= 5 | ||
| + | |BronzeReward= 3 | ||
| + | |ClearReward= 2 | ||
| + | }} | ||
| + | <br /> | ||
| + | |||
| + | {{TourBottom}} | ||
| + | |||
| + | === Fishing Tour === | ||
Players catch either as many fish as possible, or specific types of fish. | Players catch either as many fish as possible, or specific types of fish. | ||
| − | === Fossil | + | === Fossil Hunter Tour === |
Two houses appear on the island: one filled with fossils, and the other, empty. Players dig up fossils around the island using a [[shovel]], then place the fossils in the empty house to match the placement of fossils in the furnished one. | Two houses appear on the island: one filled with fossils, and the other, empty. Players dig up fossils around the island using a [[shovel]], then place the fossils in the empty house to match the placement of fossils in the furnished one. | ||
| − | === Gardening === | + | === Gardening Tour === |
{{main|Gardening Tour}} | {{main|Gardening Tour}} | ||
Players are given a list of flowers to find, pick up, and plant in a square near [[Tortimer]]. The game runs until the entire square is filled. | Players are given a list of flowers to find, pick up, and plant in a square near [[Tortimer]]. The game runs until the entire square is filled. | ||
| Line 96: | Line 399: | ||
{{Tour | {{Tour | ||
|Name= Official Gardening | |Name= Official Gardening | ||
| − | |Description= Fill the square with specifically-colored flowers. | + | |Description= Fill the square with specifically-colored or -typed flowers. |
|Difficulty= 2 | |Difficulty= 2 | ||
|Time= 5 | |Time= 5 | ||
| Line 125: | Line 428: | ||
{{TourBottom}} | {{TourBottom}} | ||
| − | === | + | === Ore Tour === |
Players use their [[shovel]]s to break open as many rocks as they can in order to find [[gem]]s. Ores are normally worth 1 point, but a type of gem can be worth 3 points, as dictated by Tortimer. In the more difficult games, Tortimer announces that there is a type or ore worth 10 points, but only 1 or 2 are found in the map. | Players use their [[shovel]]s to break open as many rocks as they can in order to find [[gem]]s. Ores are normally worth 1 point, but a type of gem can be worth 3 points, as dictated by Tortimer. In the more difficult games, Tortimer announces that there is a type or ore worth 10 points, but only 1 or 2 are found in the map. | ||
| − | === Hammer | + | === Hammer Tour === |
| − | + | ||
| + | Each player is equipped with a [[toy hammer]]. The goal of the hammer tour is to chase around a [[Cornimer]] remote control toy which must be hit with the hammer as many times as possible before the time runs out. When the toy reaches an obstacle, it will turn in a random direction. The toy will occasionally flip over, leaving it vulnerable to a barrage of easy hits. | ||
| + | |||
| + | As the difficulty increases, the toy will move faster, and rocks are scattered throughout the map. | ||
{{TourTop}} | {{TourTop}} | ||
{{Tour | {{Tour | ||
| − | |Name= Easy Hammer | + | |Name= Easy Hammer Tour |
| − | |Description= | + | |Description= Looking for an excuse to run around and bop things with a toy hammer? Then this tour for beginners is for you! |
| + | Players must hit the machine as many times as they can. | ||
|Difficulty= 1 | |Difficulty= 1 | ||
|Time= 3 | |Time= 3 | ||
| − | |Gold= 60 hits | + | |Gold= 60 or more hits |
|Silver= 48 hits | |Silver= 48 hits | ||
|Bronze= 39 hits | |Bronze= 39 hits | ||
| Line 148: | Line 455: | ||
<br /> | <br /> | ||
{{Tour | {{Tour | ||
| − | |Name= | + | |Name= Level-Up Hammer Tour |
| − | |Description= | + | |Description= Looking for more challenging hammer-bopping action? Then this intermediate tour is perfect for you! |
| + | The toy moves slightly faster and there are a multitude of rocks placed around the map | ||
|Difficulty= 2 | |Difficulty= 2 | ||
|Time= 3 | |Time= 3 | ||
| − | |Gold= 60 hits | + | |Gold= 60 or more hits |
|Silver= 48 hits | |Silver= 48 hits | ||
|Bronze= 39 hits | |Bronze= 39 hits | ||
| Line 163: | Line 471: | ||
<br /> | <br /> | ||
{{Tour | {{Tour | ||
| − | |Name= Elite Hammer | + | |Name= Elite Hammer Tour |
| − | |Description= | + | |Description= Have you fully mastered the art of the hammer? Then get ready for this master-level tour and show your stuff! |
| + | The toy moves slightly faster. | ||
|Difficulty= 3 | |Difficulty= 3 | ||
|Time= 3 | |Time= 3 | ||
| − | |Gold= 60 hits | + | |Gold= 60 or more hits |
|Silver= 48 hits | |Silver= 48 hits | ||
|Bronze= 39 hits | |Bronze= 39 hits | ||
| Line 178: | Line 487: | ||
{{TourBottom}} | {{TourBottom}} | ||
| − | === Hide and Seek === | + | === Hide and Seek Tour === |
{{main|Hide and Seek Tour}} | {{main|Hide and Seek Tour}} | ||
Players try to locate four villagers that are hiding behind buildings, trees, and other objects as quickly as possible. | Players try to locate four villagers that are hiding behind buildings, trees, and other objects as quickly as possible. | ||
| Line 287: | Line 596: | ||
{{Tour | {{Tour | ||
|Name= Easy Labyrinth | |Name= Easy Labyrinth | ||
| − | |Description= Find | + | |Description= Find 5 pieces of 1 types of fruit. |
|Difficulty= 1 | |Difficulty= 1 | ||
|Time= 5 | |Time= 5 | ||
| Line 302: | Line 611: | ||
{{Tour | {{Tour | ||
|Name= Official Labyrinth | |Name= Official Labyrinth | ||
| − | |Description= Find 3 pieces of each of | + | |Description= Find 3 pieces of each of 2 types of fruit. |
|Difficulty= 2 | |Difficulty= 2 | ||
|Time= 5 | |Time= 5 | ||
| Line 331: | Line 640: | ||
{{TourBottom}} | {{TourBottom}} | ||
| − | === Scavenger Hunt === | + | === Scavenger Hunt Tour === |
{{main|Scavenger Hunt}} | {{main|Scavenger Hunt}} | ||
Players are given a list of furniture that need to be found and picked up in the various cottages around the Island. | Players are given a list of furniture that need to be found and picked up in the various cottages around the Island. | ||
| Line 382: | Line 691: | ||
{{TourBottom}} | {{TourBottom}} | ||
| − | |||
| − | |||
| − | + | {{To-do|1=List of bugs/fish available in each tour is needed.}} | |
| − | [[Category: Island Tours]] | + | {{Image|note=Each tour should have at least one image in its section or images should be grouped together in gallery at bottom.}} |
| + | {{Navbox Gameplay elements}} | ||
| + | [[Category:Island Tours]] | ||
Latest revision as of 10:43, October 8, 2024


Tours are minigames in Animal Crossing: New Leaf that are accessible from Tortimer Island. Hosted by Tortimer, tours can be registered for by speaking to Leilani in the island's lobby and sitting in one of the chairs in the waiting area. Each tour has an objective that must be completed within a time limit. Completing the objective rewards the player with medals, the currency of Tortimer Island that can be used at the Souvenir Shop. Some tours task the player with doing something, such as catching bugs or popping balloons, as many times as possible within the time limit; the more the player does, the more medals they receive. Others have the player complete a task as fast as possible; the more time remaining when the objective is complete, the more medals received.
If there are any items in the player's pockets when going on a tour, they are automatically sold. Any tools or items needed to complete a tour appear in the player's pockets automatically when the tour starts, and additional tools can be rented from Lloid, who appears in the starting area in most tours. On some tours, it is possible to rent a net and fishing rod from Lloid. On tours where the main objective is to catch bugs, fish, or sea creatures, Lloid will only rent out a shovel and axe. On tours where nets and fishing rods are rentable, the player can catch the normal insects and fish they would on the main island during the day, as well as dragonflies and freshwater fish on the tours with a river or pond. The freshwater fish are the same as those caught between 9 a.m. and 4 p.m. in the summer in town. Any items the player picks up or fish and insects caught using Lloid rented tools during a tour can be brought back to Tortimer Island afterward.
There are a total of 64 tours, and Leilani gives the player a list of 12 random ones to choose from each day. Additionally, some tours must be unlocked before they can appear on the list.
List of tours[edit]
Balloon Hunt Tour[edit]
At the start of the tour, the slingshot will automatically be equipped. The goal of the Balloon-Hunt is to shoot down as many balloons floating in the air as possible. On the lower screen of the Nintendo 3DS will be a wind indicator, which will show the direction the balloons will be flying in, as well as the locations of the balloons. Regular balloons are worth one point, and bunny balloons are worth three points.
During multiplayer, the balloons on the map are multiplied by the number of players participating in the balloon hunt. Each player will be allocated a color, and can only pop balloons of their respective color.
| List of Tour Difficulties / Prizes | ||||||||||||||||||||||||||||||||||||||||||||||||||||||
|---|---|---|---|---|---|---|---|---|---|---|---|---|---|---|---|---|---|---|---|---|---|---|---|---|---|---|---|---|---|---|---|---|---|---|---|---|---|---|---|---|---|---|---|---|---|---|---|---|---|---|---|---|---|---|
| ||||||||||||||||||||||||||||||||||||||||||||||||||||||
The info screen on Balloon-Hunt
A player playing Balloon-Hunt


Bug Catching Tour[edit]
The player is equipped with a net at the start of this tour. The goal of the Bug Catching Tour is to find as many of the specified insects as possible. Some tours require specific species, or high-selling insects.
| List of Tour Difficulties / Prizes | ||||||||||||||||||||||||||||||||||||||||||||||||||||||||||||||||||||||||||||||||||||||||||||||||||||||||||||||||||||||||||||||||||||||||||||||||||||||||||||||||||||||||||||||||||||||||||||||||||||||||||||||||||||||||||||||||||||||||||||||||||||||||||||
|---|---|---|---|---|---|---|---|---|---|---|---|---|---|---|---|---|---|---|---|---|---|---|---|---|---|---|---|---|---|---|---|---|---|---|---|---|---|---|---|---|---|---|---|---|---|---|---|---|---|---|---|---|---|---|---|---|---|---|---|---|---|---|---|---|---|---|---|---|---|---|---|---|---|---|---|---|---|---|---|---|---|---|---|---|---|---|---|---|---|---|---|---|---|---|---|---|---|---|---|---|---|---|---|---|---|---|---|---|---|---|---|---|---|---|---|---|---|---|---|---|---|---|---|---|---|---|---|---|---|---|---|---|---|---|---|---|---|---|---|---|---|---|---|---|---|---|---|---|---|---|---|---|---|---|---|---|---|---|---|---|---|---|---|---|---|---|---|---|---|---|---|---|---|---|---|---|---|---|---|---|---|---|---|---|---|---|---|---|---|---|---|---|---|---|---|---|---|---|---|---|---|---|---|---|---|---|---|---|---|---|---|---|---|---|---|---|---|---|---|---|---|---|---|---|---|---|---|---|---|---|---|---|---|---|---|---|---|---|---|---|---|---|---|---|---|---|---|---|---|---|---|---|
| ||||||||||||||||||||||||||||||||||||||||||||||||||||||||||||||||||||||||||||||||||||||||||||||||||||||||||||||||||||||||||||||||||||||||||||||||||||||||||||||||||||||||||||||||||||||||||||||||||||||||||||||||||||||||||||||||||||||||||||||||||||||||||||
Diving Tour[edit]
The player must catch Sea creatures found at the bottom of the sea by diving to catch them. The island that this takes place on will have water on all four sides, so there is plenty of sea to swim around in.
| List of Tour Difficulties / Prizes | ||||||||||||||||||||||||||||||||||||||||||||||||||||||||||||||||||||||||
|---|---|---|---|---|---|---|---|---|---|---|---|---|---|---|---|---|---|---|---|---|---|---|---|---|---|---|---|---|---|---|---|---|---|---|---|---|---|---|---|---|---|---|---|---|---|---|---|---|---|---|---|---|---|---|---|---|---|---|---|---|---|---|---|---|---|---|---|---|---|---|---|---|
| ||||||||||||||||||||||||||||||||||||||||||||||||||||||||||||||||||||||||
Fishing Tour[edit]
Players catch either as many fish as possible, or specific types of fish.
Fossil Hunter Tour[edit]
Two houses appear on the island: one filled with fossils, and the other, empty. Players dig up fossils around the island using a shovel, then place the fossils in the empty house to match the placement of fossils in the furnished one.
Gardening Tour[edit]
Players are given a list of flowers to find, pick up, and plant in a square near Tortimer. The game runs until the entire square is filled.
| List of Tour Difficulties / Prizes | ||||||||||||||||||||||||||||||||||||||||||||||||||||||
|---|---|---|---|---|---|---|---|---|---|---|---|---|---|---|---|---|---|---|---|---|---|---|---|---|---|---|---|---|---|---|---|---|---|---|---|---|---|---|---|---|---|---|---|---|---|---|---|---|---|---|---|---|---|---|
| ||||||||||||||||||||||||||||||||||||||||||||||||||||||
Ore Tour[edit]
Players use their shovels to break open as many rocks as they can in order to find gems. Ores are normally worth 1 point, but a type of gem can be worth 3 points, as dictated by Tortimer. In the more difficult games, Tortimer announces that there is a type or ore worth 10 points, but only 1 or 2 are found in the map.
Hammer Tour[edit]
Each player is equipped with a toy hammer. The goal of the hammer tour is to chase around a Cornimer remote control toy which must be hit with the hammer as many times as possible before the time runs out. When the toy reaches an obstacle, it will turn in a random direction. The toy will occasionally flip over, leaving it vulnerable to a barrage of easy hits.
As the difficulty increases, the toy will move faster, and rocks are scattered throughout the map.
| List of Tour Difficulties / Prizes | ||||||||||||||||||||||||||||||||||||||||||||||||||||||
|---|---|---|---|---|---|---|---|---|---|---|---|---|---|---|---|---|---|---|---|---|---|---|---|---|---|---|---|---|---|---|---|---|---|---|---|---|---|---|---|---|---|---|---|---|---|---|---|---|---|---|---|---|---|---|
| ||||||||||||||||||||||||||||||||||||||||||||||||||||||
Hide and Seek Tour[edit]
Players try to locate four villagers that are hiding behind buildings, trees, and other objects as quickly as possible.
| List of Tour Difficulties / Prizes | ||||||||||||||||||||||||||||||||||||||||||||||||||||||
|---|---|---|---|---|---|---|---|---|---|---|---|---|---|---|---|---|---|---|---|---|---|---|---|---|---|---|---|---|---|---|---|---|---|---|---|---|---|---|---|---|---|---|---|---|---|---|---|---|---|---|---|---|---|---|
| ||||||||||||||||||||||||||||||||||||||||||||||||||||||
Item Matching Tour[edit]
Pairs of items are buried in the ground. Players dig up an item, then have to dig up the matching item. digging up matching items results in the items being removed from the ground; otherwise, they are buried again.
| List of Tour Difficulties / Prizes | ||||||||||||||||||||||||||||||||||||||||||||||||||||||
|---|---|---|---|---|---|---|---|---|---|---|---|---|---|---|---|---|---|---|---|---|---|---|---|---|---|---|---|---|---|---|---|---|---|---|---|---|---|---|---|---|---|---|---|---|---|---|---|---|---|---|---|---|---|---|
| ||||||||||||||||||||||||||||||||||||||||||||||||||||||
Labyrinth Tour[edit]
Players search for specific types of fruit in a maze made up of bushes.
| List of Tour Difficulties / Prizes | ||||||||||||||||||||||||||||||||||||||||||||||||||||||
|---|---|---|---|---|---|---|---|---|---|---|---|---|---|---|---|---|---|---|---|---|---|---|---|---|---|---|---|---|---|---|---|---|---|---|---|---|---|---|---|---|---|---|---|---|---|---|---|---|---|---|---|---|---|---|
| ||||||||||||||||||||||||||||||||||||||||||||||||||||||
Scavenger Hunt Tour[edit]
Players are given a list of furniture that need to be found and picked up in the various cottages around the Island.
| List of Tour Difficulties / Prizes | ||||||||||||||||||||||||||||||||||||||||||||||||||||||
|---|---|---|---|---|---|---|---|---|---|---|---|---|---|---|---|---|---|---|---|---|---|---|---|---|---|---|---|---|---|---|---|---|---|---|---|---|---|---|---|---|---|---|---|---|---|---|---|---|---|---|---|---|---|---|
| ||||||||||||||||||||||||||||||||||||||||||||||||||||||
- List of bugs/fish available in each tour is needed.
- List of bugs/fish available in each tour is needed.
Further details: Each tour should have at least one image in its section or images should be grouped together in gallery at bottom.
Further details: Each tour should have at least one image in its section or images should be grouped together in gallery at bottom.
| Gameplay elements | ||||||||||||||||||||||||||
|---|---|---|---|---|---|---|---|---|---|---|---|---|---|---|---|---|---|---|---|---|---|---|---|---|---|---|
| ||||||||||||||||||||||||||