Difference between revisions of "Photo (screenshot)"
Decomposer (talk | contribs) (Added (without using third-party software); Moved photos to Gallery) |
AlexBot2004 (talk | contribs) (→Appearances: Using Template:Input) |
||
| (34 intermediate revisions by 11 users not shown) | |||
| Line 1: | Line 1: | ||
| − | {{ | + | {{Wrongpage|the screenshots taken by the player|the photos of villagers given to the player|Photo}} |
| − | '''Photos''' are | + | [[File:Menu Camera NH Icon.png|right|x96px]] |
| + | '''Photos''', also known as '''pictures''', are in-game screenshots that can be taken in {{DnMe+}}, {{CF}}, {{NL}}, and {{NH}}. A photo can be taken at almost any time during gameplay. | ||
| − | == | + | ==Appearances== |
| − | ===In {{ | + | ===In {{DnMe+|nolink}}=== |
| − | A photo | + | [[File:DnMe+ Surveillance Center.jpg|thumb|right|200px|A photo taken in {{DnMe+|nolink}}. Note the Nintendo watermark at the bottom-right.]] |
| + | In {{DnMe+}}, if an SD card is connected to the [[Nintendo GameCube]] via a Memory Card adapter, photos can be taken with {{Input|z|console=GCN}}. The resulting screenshot can be saved to the SD card as a 640x480 TIF file with a watermark in the bottom-right corner that reads "©2001-2003 Nintendo". Photos on the SD card can be viewed in-game if "SD card" is selected in the startup menu. | ||
| − | + | ===In {{CF|short|nolink}}=== | |
| + | [[File:CF Photo Taking.png|thumb|left|200px|A player taking a photo in {{CF|short|nolink}}.]] | ||
| + | In {{CF}}, a photo can be taken by pressing {{Input|1|console=wii}} on the [[Wii]] Remote. The photo will capture everything shown on the screen at that time, including HUD elements such as the clock. {{Input|2|console=Wii}} can be pressed to view the photo. The photo can then be saved to an SD card. The game will store only one photo at a time, and each new photo will erase the one previously taken. To save multiple photos, each one must be saved to the SD card before taking another photo. The resulting screenshot is saved as a 896x480 or 640x480 JPG file, depending on the Wii's set aspect ratio. | ||
| − | + | If there is no SD card in the Wii, pictures still can be taken and previewed, but the game will say that there is no SD card inserted into the Wii when trying to save a photo. | |
| − | |||
| − | The Nintendo 3DS has a limit of | + | Since {{CF|short|nolink}} predates the Wii System Update allowing for high-capacity storage, the game only supports SD Cards up to 2 GB. SD Cards that exceed 2 GB or are SDHC/SDXC cards will be considered an "unknown device" by the game and cannot be used to save pictures. |
| + | {{Clear}} | ||
| + | |||
| + | ===In {{NL|short|nolink}}=== | ||
| + | [[File:NL Daisy Screenshot Tutorial.jpg|thumb|right|200px|Daisy teaching the player how to take a photo in {{NL|short|nolink}}.]] | ||
| + | In {{NL}}, a photo can be taken by pressing {{Input|l|console=3DS}} and {{Input|r|console=3DS}} simultaneously, and will capture any HUD elements displayed on the screen at the time of the photo. Only the top screen will be captured—it is not possible to take a photo of the touch-screen without using third-party software. It is also not possible to take a photo in certain areas. All photos are saved on the SD card as 400x240 JPG files, and they can be viewed in the ''Nintendo 3DS Camera'' application. | ||
| + | |||
| + | The Nintendo 3DS has a limit of 3,000 photos that can be stored. When the limit is reached, a warning will be displayed saying that the player is no longer able to take photos. | ||
| + | |||
| + | ====amiibo Camera==== | ||
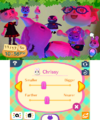
| + | The amiibo Camera is a feature introduced in {{NLWa}} that has similar functionality to the Nintendo 3DS Camera but adds the ability to add villagers currently in town, including the [[player]]. The user can also add villagers using the [[amiibo]] feature by tapping their respective card or figurine. Once in the canvas, their position, rotation, size, and depth can be changed, as well as the image's lighting, canvas, and timestamp. The villagers' outfits are the ones they wear by default and cannot be changed, while the players' are their outfits during gameplay. | ||
| + | |||
| + | The amiibo Camera remembers which villagers have been there and their positions and emotions, and, after [[moving|moving out]], they will still appear in the application until they get removed by the user. The only way to reintroduce them is to scan their respective amiibo, or make sure they reappear in town. | ||
| + | |||
| + | ===In {{NH|short|nolink}}=== | ||
| + | [[File:NH Camera UI.jpg|thumb|right|250px|The UI of the Camera app in {{NH|short|nolink}}.]] | ||
| + | In {{NH}}, players can take a screenshot by pressing the Capture button on the Joy-Con or Pro Controller like any other Nintendo Switch game. However, on the [[NookPhone]], there is a designated Camera app unlocked from the start. Players can add several different filters and borders to customize their screenshots and take a screenshot with {{Input|+}}. The resulting screenshots are saved to the Nintendo Switch's photo album as 1280x720 JPG files, regardless of whether the Switch is in Handheld or TV Mode. Players can also hold down the Capture button to take a 30-second video of gameplay. Beginning in version 1.4.0, the HUD during photo mode can be hidden by pressing {{Input|rstick-press}}. | ||
| + | |||
| + | The Nintendo Switch has a limit of 1,000 photos and 100 videos (10,000 photos and 1,000 videos on an SD card) that can be stored. Once the limit is reached, the Nintendo Switch system will warn the user that they can no longer take any screenshots, and that they must delete photos/videos to continuing taking screenshots. | ||
| + | |||
| + | A new addition to {{NH|short|nolink}} is Photopia on [[Harv's Island]], where the player can arrange various sets with props and villagers. These villagers can be residents from the player's island, or they can be characters scanned in via [[amiibo]]. In {{HHP|short}}, the player can take a photo and use that as the main photo for a resident's vacation home. If a resident already has a photo for their vacation home, then when taking a new photo the player may choose to continue using the old photo or use the new photo. | ||
| + | |||
| + | Beginning in the {{NHVer|2.0|full}}, an upgraded version of the Camera app called Pro Camera is available, which gives the player the ability to take photos in first person mode, as well as setting up a tripod to lock the camera in place. | ||
| + | |||
| + | ====Filters and overlays==== | ||
| + | Filters and overlays can be added to photos by pressing {{Input|zl}} and {{Input|l}}, respectively. Below is a gallery of each filter and overlay. | ||
| + | |||
| + | <gallery widths=175> | ||
| + | NH Camera Filter - Sharp.jpg|Sharp | ||
| + | NH Camera Filter - Pop.jpg|Pop | ||
| + | NH Camera Filter - Soft.jpg|Soft | ||
| + | NH Camera Filter - Dramatic.jpg|Dramatic | ||
| + | NH Camera Filter - Film.jpg|Film | ||
| + | NH Camera Filter - Monochrome.jpg|Monochrome | ||
| + | NH Camera Filter - Antique.jpg|Antique | ||
| + | NH Camera Filter - Painting.jpg|Painting | ||
| + | NH Camera Filter - Retro.jpg|Retro | ||
| + | NH Camera Filter - Surveillance.jpg|Surveillance | ||
| + | NH Camera Filter - Fish-Eye Lens.jpg|Fish-Eye Lens | ||
| + | NH Camera Overlay - Frame.jpg|Frame | ||
| + | NH Camera Overlay - Cinema.jpg|Cinema | ||
| + | NH Camera Overlay - Time.jpg|Time | ||
| + | NH Camera Overlay - Date.jpg|Date | ||
| + | NH Camera Overlay - Frame + Date.jpg|Frame + Date | ||
| + | </gallery> | ||
==Gallery== | ==Gallery== | ||
| − | + | <gallery> | |
| − | + | CF Patty Photo Tutorial.jpg|Patty teaching the player how to take a photo in {{CF|short|nolink}}. | |
| − | + | NL Can't Take Screenshot.jpg|A player unable to take a photo in {{NL|short|nolink}}. | |
| − | + | NL Photo Limit Reached.jpg|A player unable to take a photo in {{NL|short|nolink}}. | |
| − | + | NLWa amiibo Camera Demonstration.png|A demo of the amiibo camera in {{NLWa|short|nolink}}. | |
| − | </gallery> | + | NLWa Promo amiibo Camera 2.jpg|A demo of the amiibo Camera in {{NLWa|short|nolink}}. Note the presence of special characters. |
| − | + | </gallery> | |
| − | |||
| − | + | {{To-do|What happens when a screenshot is taken in a game cartridge '''without''' the SD card?|Add {{HHD|short}} information}} | |
| + | {{Navbox Gameplay elements}} | ||
Latest revision as of 18:20, January 2, 2024
Photos, also known as pictures, are in-game screenshots that can be taken in Doubutsu no Mori e+, Animal Crossing: City Folk, Animal Crossing: New Leaf, and Animal Crossing: New Horizons. A photo can be taken at almost any time during gameplay.
Appearances[edit]
In Doubutsu no Mori e+[edit]
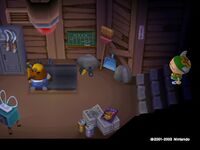
In Doubutsu no Mori e+, if an SD card is connected to the Nintendo GameCube via a Memory Card adapter, photos can be taken with . The resulting screenshot can be saved to the SD card as a 640x480 TIF file with a watermark in the bottom-right corner that reads "©2001-2003 Nintendo". Photos on the SD card can be viewed in-game if "SD card" is selected in the startup menu.
In City Folk[edit]
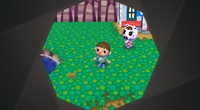
In Animal Crossing: City Folk, a photo can be taken by pressing on the Wii Remote. The photo will capture everything shown on the screen at that time, including HUD elements such as the clock.
can be pressed to view the photo. The photo can then be saved to an SD card. The game will store only one photo at a time, and each new photo will erase the one previously taken. To save multiple photos, each one must be saved to the SD card before taking another photo. The resulting screenshot is saved as a 896x480 or 640x480 JPG file, depending on the Wii's set aspect ratio.
If there is no SD card in the Wii, pictures still can be taken and previewed, but the game will say that there is no SD card inserted into the Wii when trying to save a photo.
Since City Folk predates the Wii System Update allowing for high-capacity storage, the game only supports SD Cards up to 2 GB. SD Cards that exceed 2 GB or are SDHC/SDXC cards will be considered an "unknown device" by the game and cannot be used to save pictures.
In New Leaf[edit]
In Animal Crossing: New Leaf, a photo can be taken by pressing and
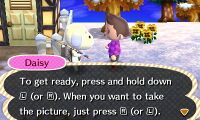
simultaneously, and will capture any HUD elements displayed on the screen at the time of the photo. Only the top screen will be captured—it is not possible to take a photo of the touch-screen without using third-party software. It is also not possible to take a photo in certain areas. All photos are saved on the SD card as 400x240 JPG files, and they can be viewed in the Nintendo 3DS Camera application.
The Nintendo 3DS has a limit of 3,000 photos that can be stored. When the limit is reached, a warning will be displayed saying that the player is no longer able to take photos.
amiibo Camera[edit]
The amiibo Camera is a feature introduced in Animal Crossing: New Leaf - Welcome amiibo that has similar functionality to the Nintendo 3DS Camera but adds the ability to add villagers currently in town, including the player. The user can also add villagers using the amiibo feature by tapping their respective card or figurine. Once in the canvas, their position, rotation, size, and depth can be changed, as well as the image's lighting, canvas, and timestamp. The villagers' outfits are the ones they wear by default and cannot be changed, while the players' are their outfits during gameplay.
The amiibo Camera remembers which villagers have been there and their positions and emotions, and, after moving out, they will still appear in the application until they get removed by the user. The only way to reintroduce them is to scan their respective amiibo, or make sure they reappear in town.
In New Horizons[edit]
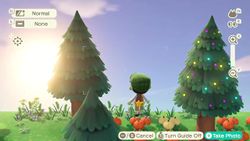
In Animal Crossing: New Horizons, players can take a screenshot by pressing the Capture button on the Joy-Con or Pro Controller like any other Nintendo Switch game. However, on the NookPhone, there is a designated Camera app unlocked from the start. Players can add several different filters and borders to customize their screenshots and take a screenshot with . The resulting screenshots are saved to the Nintendo Switch's photo album as 1280x720 JPG files, regardless of whether the Switch is in Handheld or TV Mode. Players can also hold down the Capture button to take a 30-second video of gameplay. Beginning in version 1.4.0, the HUD during photo mode can be hidden by pressing
.
The Nintendo Switch has a limit of 1,000 photos and 100 videos (10,000 photos and 1,000 videos on an SD card) that can be stored. Once the limit is reached, the Nintendo Switch system will warn the user that they can no longer take any screenshots, and that they must delete photos/videos to continuing taking screenshots.
A new addition to New Horizons is Photopia on Harv's Island, where the player can arrange various sets with props and villagers. These villagers can be residents from the player's island, or they can be characters scanned in via amiibo. In Happy Home Paradise, the player can take a photo and use that as the main photo for a resident's vacation home. If a resident already has a photo for their vacation home, then when taking a new photo the player may choose to continue using the old photo or use the new photo.
Beginning in the 2.0 Free Update, an upgraded version of the Camera app called Pro Camera is available, which gives the player the ability to take photos in first person mode, as well as setting up a tripod to lock the camera in place.
Filters and overlays[edit]
Filters and overlays can be added to photos by pressing and
, respectively. Below is a gallery of each filter and overlay.
Gallery[edit]
- What happens when a screenshot is taken in a game cartridge without the SD card?
- Add Happy Home Designer information
- What happens when a screenshot is taken in a game cartridge without the SD card?
- Add Happy Home Designer information
| Gameplay elements | ||||||||||||||||||||||||||
|---|---|---|---|---|---|---|---|---|---|---|---|---|---|---|---|---|---|---|---|---|---|---|---|---|---|---|
| ||||||||||||||||||||||||||
